
You know how it is—craving something sweet but dreading the oven heat? I’ve been there too. Over the years, I’ve tested countless no-bake and stovetop recipes, and this vanilla milk cake has become my absolute favorite. It’s the kind of dessert that always works, even if you’re new to baking. I’ve made it dozens of times for last-minute gatherings, and it never fails to impress. The secret? A simple stovetop method and a creamy milk soak that transforms the cake into something outrageously tender.
Table of Contents
Ingredients
Before you begin, let’s take a quick look at the ingredients you’ll need for this easy and delicious vanilla milk cake. The best part? These are all basic pantry staples, so you probably already have most of them on hand! Here’s the breakdown:
Wet Ingredients:
- 2 eggs – The base for your batter, giving structure and moisture.
- ⅓ cup granulated sugar – This sweetens the cake while helping it achieve a lovely texture.
- ¼ cup oil – A neutral oil like vegetable or canola works best. This helps the cake stay soft and moist.
- 1 tsp vanilla extract – The key flavor that really makes this cake shine. Don’t skip it!
- 2–3 tbsp water – This thins the batter just enough to create a soft, fluffy cake.
Dry Ingredients:
- ⅔ cup all-purpose flour – This is the foundation of your cake, creating the perfect crumb. Measure each ingredient carefully to get the best results.
- ½ tsp baking powder – This leavening agent helps the cake rise, giving it a light, airy texture.
For the Milk Soak:
- ¼ cup condensed milk – This adds richness and sweetness, creating the perfect soaking liquid.
- ¼ cup whipping cream – Adds creaminess to the soak, ensuring the cake stays soft and indulgent.
- 1 cup thick milk – Whole milk or full-fat milk is ideal here for a richer flavor and texture.
For Garnishing:
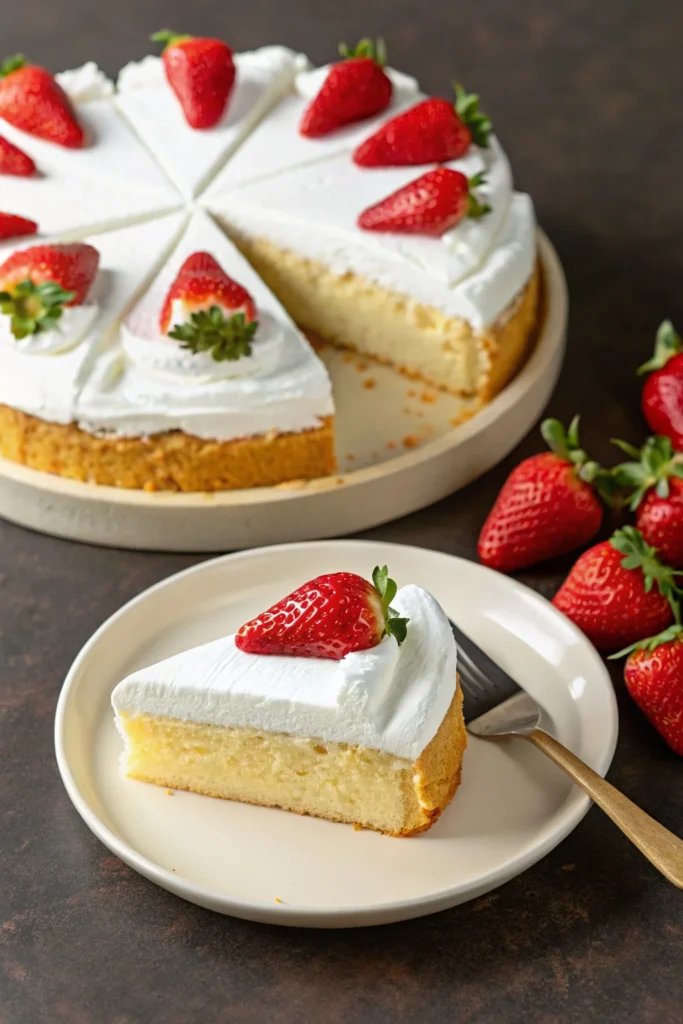
- Whipped cream – The perfect topping for this soft, milk-soaked cake.
- Fresh strawberries – For a burst of freshness and a pop of color that makes your cake look as good as it tastes.
How to Make Vanilla Milk Cake: Step-by-Step
Now that we’ve gathered all the ingredients, it’s time to roll up our sleeves and get baking! Don’t worry, this process is simple and straightforward—just follow these steps, and you’ll be enjoying a delicious, milk-soaked cake in no time.
Step 1: Beat the Eggs and Sugar
Start by cracking 2 eggs into a mixing bowl. Add ⅓ cup of granulated sugar and whisk them together until the mixture becomes light and frothy. This step is crucial for achieving the cake’s soft and airy texture, so take your time. If you have a hand mixer, this will go quickly, but a whisk works just as well for a bit of extra arm workout!
Step 2: Add the Oil
Next, pour in ¼ cup of neutral oil (like vegetable or canola oil). Stir it in well so it blends smoothly with the eggs and sugar. The oil helps keep the cake moist, so don’t skip this step—it’s essential for that melt-in-your-mouth consistency.
Step 3: Mix the Dry Ingredients
In another bowl, mix ⅔ cup of all-purpose flour with ½ teaspoon of baking powder. Slowly add this to the wet mixture, stirring in the same direction to keep the batter silky. Be careful not to overmix, as it can make the cake heavy instead of light.
Step 4: Add the Vanilla and Water
Now it’s time for flavor! Stir in 1 teaspoon of vanilla extract, which gives the cake its signature comforting taste. Follow this with 2-3 tablespoons of water—this thins the batter just enough to create a silky texture that bakes into a soft, delicate crumb.
Step 5: Prepare the Pan
Lightly coat a 7-inch pan with oil or butter. For easier removal after baking, you can also line the bottom with parchment paper. Pour the batter into the pan and gently spread it out evenly with a spatula.
Step 6: Cook the Cake
Place the pan on the stovetop over medium flame. Cover it with a lid and let it cook for about 15-25 minutes. To see if the cake is done, stick a toothpick into the center. If it comes out clean, the cake is ready to cool. If it comes out clean, your cake is ready! If not, simply cover it back up and give it a few more minutes.
Step 7: Let It Cool
Once your cake is cooked, carefully remove it from the pan and let it cool completely on a wire rack. Cooling the cake is important because it allows the batter to set and prepares it for the soaking step, where all the magic happens.
Step 8: Prepare the Milk Soak
As the cake cools down, combine ¼ cup condensed milk, ¼ cup whipping cream, and 1 cup thick milk in a bowl, stirring until smooth. Stir until smooth. This soak is what makes the cake irresistibly moist and rich—trust me, it’s worth the wait.
Step 9: Soak the Cake
After the cake has cooled completely, poke small holes all over the top with a fork. This lets the milk mixture seep in evenly when you pour it over the cake. Let it rest for about 10 minutes, allowing the cake to absorb all that creamy goodness.
Step 10: Top and Serve
To finish, top your cake with whipped cream and garnish with fresh strawberries. A sprig of mint is a nice touch if you want to make it extra special. Slice, serve, and enjoy!
For more delicious recipes, check out our Desserts Section.
Serving Suggestions
Once your vanilla milk cake is ready, it’s time to present it beautifully! This delightful dessert is wonderfully flexible and can be enjoyed in so many delicious ways. Whether you’re planning a cozy family dessert or a festive gathering, here are some creative serving ideas to make your cake even more special:
1. Topped with Whipped Cream and Fresh Berries
For a simple yet elegant finish, top your cake with a fluffy swirl of whipped cream and a handful of fresh strawberries. The combination of the soft cake, airy cream, and juicy berries creates a refreshing and irresistible bite.
2. Drizzled with Chocolate or Caramel
To add a decadent touch, lightly drizzle chocolate or caramel sauce over the cake. These rich, silky sauces pair perfectly with the cake’s moist texture, adding a hint of luxury that’s hard to resist—ideal for anyone who loves a little extra sweetness!
3. Paired with a Warm Beverage
Enjoy your vanilla milk cake alongside a hot cup of coffee, tea, or rich hot chocolate. The gentle vanilla notes of the cake pair wonderfully with the bold flavors of warm drinks, making it a comforting treat for any time of day.
4. Garnished with Nuts or Toasted Coconut
For a bit of crunch, sprinkle some chopped almonds, walnuts, or toasted coconut flakes over the top. These add a lovely texture and a delicious nutty or tropical flavor that complements the cake’s smooth, milky base.
5. Mini Versions for Parties
If you’re serving a crowd, try baking the cake in smaller molds like cupcake tins or mini ramekins. Individual portions make for a charming presentation and allow guests to personalize their toppings. Plus, they also make adorable party favors that guests will love!

Vanilla Milk Cake Recipe
Ingredients
Wet Ingredients:
- 2 eggs
- ⅓ cup granulated sugar
- ¼ cup neutral oil vegetable or canola
- 1 tsp vanilla extract
- 2 –3 tbsp water
Dry Ingredients:
- ⅔ cup all-purpose flour
- ½ tsp baking powder
For the Milk Soak:
- ¼ cup condensed milk
- ¼ cup whipping cream
- 1 cup thick milk whole milk or full-fat milk
For Garnishing:
- Whipped cream
- Fresh strawberries
Instructions
Beat the Eggs and Sugar:
- In a mixing bowl, whisk together 2 eggs and ⅓ cup granulated sugar until light and frothy.
Add the Oil:
- Stir in ¼ cup of neutral oil to keep the cake moist.
Mix the Dry Ingredients:
- Combine ⅔ cup all-purpose flour and ½ tsp baking powder in another bowl. Gradually add this to the wet mixture, stirring gently to avoid overmixing.
Add the Vanilla and Water:
- Stir in 1 tsp vanilla extract and 2–3 tbsp water to thin the batter and enhance the flavor.
Prepare the Pan:
- Lightly grease a 7-inch pan with oil or butter. Pour the batter into the pan and spread it evenly with a spatula.
Cook the Cake:
- Place the pan on the stovetop over medium flame. Cover with a lid and cook for 15–20 minutes. Check doneness by inserting a toothpick; if it comes out clean, the cake is ready.
Let It Cool:
- Remove the cake from the pan and let it cool completely on a wire rack.
Prepare the Milk Soak:
- In a bowl, mix ¼ cup condensed milk, ¼ cup whipping cream, and 1 cup thick milk until smooth.
Soak the Cake:
- Poke small holes across the top of the cooled cake using a fork. Pour the milk soak evenly over the cake and let it rest for 10 minutes to absorb.
Top and Serve:
- Finish with whipped cream and garnish with fresh strawberries. Slice and serve!
Notes
Fat: 14g
Saturated Fat: 5g
Carbohydrates: 42g
Sugars: 28g
Fiber: 1g
Protein: 5g
Cholesterol: 75mg
Sodium: 120mg Disclaimer: Nutritional values are approximate and based on automated calculations. Actual numbers may vary depending on the specific ingredients and brands used. For precise information, please check the nutrition labels of your ingredients or refer to your preferred brand’s data.
FAQs About Vanilla Milk Cake
We know you’re excited to try this vanilla milk cake, but you might have a few questions before you get started. Don’t worry, we’ve got you covered! Below are some frequently asked questions, along with answers to help you make this cake as perfect as possible.
1. Can I make this cake without a stovetop?
Absolutely! If you prefer to bake the cake in the oven, you can preheat your oven to 350°F (175°C) and bake the cake in a greased 7-inch round cake pan for about 25-30 minutes or until a toothpick comes out clean. This stovetop method, however, keeps things quick and simple if you don’t have access to an oven.
2. Can I substitute the milk soak ingredients?
Yes, you can adjust the milk soak to your taste! For example, you can replace the condensed milk with sweetened coconut milk for a tropical twist, or use almond milk if you’re looking for a dairy-free alternative. Just make sure to balance the sweetness as needed.
3. What can I use instead of whipping cream?
If you don’t have whipping cream, you can substitute it with heavy cream, which will provide a similar rich texture. Alternatively, for a lighter option, you can use coconut cream for a dairy-free version that still gives you a creamy, indulgent soak.
4. How can I make this cake gluten-free?
To make this cake gluten-free, simply swap the all-purpose flour for a 1:1 gluten-free flour blend. Make sure the blend contains xanthan gum or another binding agent to keep the cake’s texture intact.
5. How do I know when the cake is fully cooked?
The best way to check is by inserting a toothpick or cake tester into the center of the cake. If it comes out clean or with just a few crumbs, the cake is done. If the toothpick comes out wet or sticky, give the cake a few more minutes to cook, and then check again.
6. Can I freeze this cake?
Yes, this cake freezes well! Once fully cooled, wrap individual slices in plastic wrap and store them in an airtight container or freezer-safe bag. To thaw, simply let it sit at room temperature for 30 minutes or microwave for a few seconds. You can even freeze the cake without the milk soak, adding it just before serving for a fresh, moist texture.
7. What other toppings can I try?
While whipped cream and fresh strawberries are classic, you can get creative with your toppings! Try drizzling a little honey, adding toasted almonds for crunch, or even a scoop of your favorite ice cream for an extra indulgent treat.
Conclusion: Why You’ll Love This Vanilla Milk Cake
Whether you’re a seasoned baker or just starting out in the kitchen, this vanilla milk cake is a must-try. It’s simple, quick, and oh-so-satisfying. The beauty of this recipe lies in its versatility—whether you’re enjoying it as an everyday dessert or serving it at a special occasion, it’s guaranteed to impress. The soft, moist texture from the milk soak and the rich vanilla flavor come together in perfect harmony, making it a dessert you’ll return to time and time again.
Why This Cake Stands Out:
- No oven required: Perfect for when you’re short on time or don’t have access to an oven.
- Beginner-friendly: With just a few basic ingredients and simple steps, anyone can make this cake!
- Customizable: From toppings to flavor variations, you can tweak this cake to suit your preferences.
- Ideal for any occasion: Whether it’s a casual treat, a family gathering, or a holiday dessert, this cake is always a winner.
Storing and Reheating:
If you have leftovers (which is rare!), store the cake in an airtight container at room temperature for up to 2-3 days. For longer storage, keep it in the fridge for up to a week. You can reheat individual slices in the microwave for a few seconds for that just-baked warmth or enjoy it chilled for a refreshing treat.